Showing posts with label Garden Life. Show all posts

Tuesday, April 24, 2012

Dog Vs Garden: Meet the Fence

Never underestimate someone just because they have cute ears or flatter you with kisses

The biggest threats to our gardening efforts do not come from pests, but from those that snuggle up against my legs and keep me warm all winter long.  Yes, my pups may be my best friends, but they are not my garden’s best friends.

Over the last two years I have tried a variety of things to ward them off, with mediocre but up-till-now acceptable success.  I have mostly tried strategies that were low cost and low effort.  Someone suggested I try cayenne pepper sprinkled over the garden as a deterrent.  This might have worked out well, except that some accidentally got into my pup’s eye and it swelled shut for a day or so and I felt like the worst parent ever in the world. It was particularly depressing because it still didn’t keep him out of the garden.

When this failed, I finally decided to lay out a bit of cash and bought what we affectionately refer to as “the rock monster”, which is basically a battery operated invisible fence that keeps dogs away from its ten foot radius.  This worked well until the batteries died, but trained the dog to stay out of the garden until summer drought killed most things and a mini tall grass prairie sprung up and I didn’t care anymore if the dog ruined things or not.

Another idea I tried was my own special version “companion planting”.  I planted all my hot chili de aqua peppers around the outer edge of my garden in hopes that if my dog ventured in for a snack that he would have an unpleasant experience and never do it again.  This didn’t really have an effect.  My best plan was to plant multiples of everything as an insurance against canine catastrophe and hoped for the best. Yea, it wasn’t a great plan, but it was also pre-Cowboy involvement, and he has a way of improving my plans in ways I couldn’t previously imagine.

But this year there are now two dogs, which means like three times the destruction.  After all the effort to build trellises and defeat the weeds and our desire grow so many more items, we needed a better plan.  At first, I tried a liberal layer of cayenne pepper (with no puppy eyes harmed) but it didn’t stop either of them.  And we tried the rock monster, but only one could wear it at a time and it didn’t cover the whole garden.  So, after we lost a pepper and an eggplant to veggie loving pups within a few hours of 
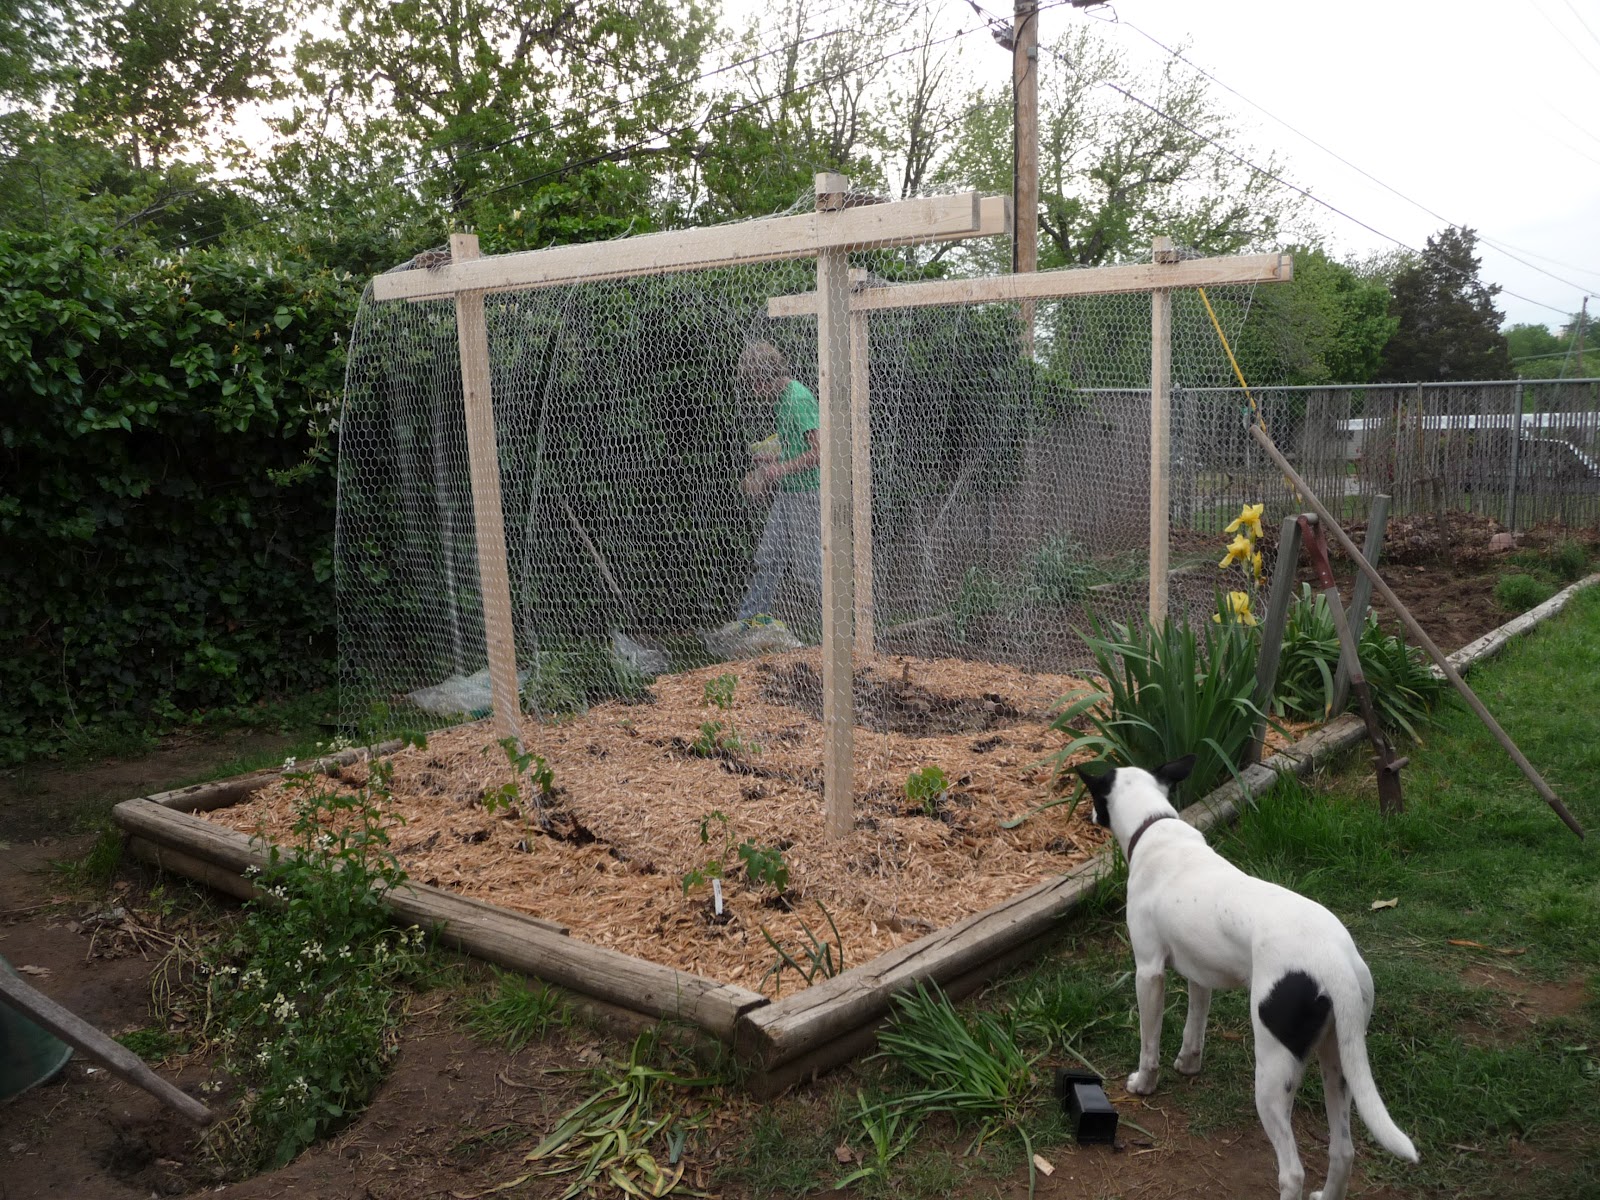
planting, we decided we needed to break down and build a fence.  Not a pretty one, just an effective one, and as soon as possible.
Harley sits safely on the other side of the new garden fence from this beautiful marguerite daisy plant The Cowboy picked out that will hopefully attract more butterflies and fewer puppy dogs.


The Cowboy came by on his day off and built it with his bare hands with the help of his roommate. I think a t-post driver was also involved, but I am still pretty sure his hands were bare. He said that the project went much faster than anticipated and texted pictures that looked great. And it was only a one band aid necessary project (trellis building was a two band aid day).  I came home from work that night eager to see his handiwork, but was greeted by only one puppy face at the gate!! Someone was missing.  That someone was behind the garden fence sitting with the marigolds he had ripped off their stems.  Scandalous!
The Marigold Murderer investigating checking out his handiwork


So, the next day was fence building day part two, which has so far proved quite effective.  The Cowboy re-enforced the breached defenses, constructed a gate, and I happily planted some additional plant selections. 


So far we have had no more blue heeler break-ins, so we hope our harvest losses have been minimized. Hopefully we have outsmarted them.  Although, you never want to underestimate a blue heeler, not even the tiny adorable cuddly ones. 


What strategies have you used to keeping your homestead harmoniously co-existing?  Do you have any hilarious failures or wild success tips for keeping canines out of the compost?  I am all ears.
Puppy Mug Shot

Sunday, April 22, 2012

Garden Spotlight: Icelandic Poppy

You know that feeling you get when you see someone and you are simultaneously aware of how ridiculously attracted you are to them and how much trouble they will bring into your life.

I recently had an encounter like this last week at the garden store.  Not with a person, but with a plant. I fell in love at first sight with a poppy.  An Icelandic Poppy. I saw it and the way the six o'clock light filtered through it's almost glowing pink papery petals took my breath away. At first standing there in the store googling it from my phone, I decided it was a bad idea since experts advised that it did not do well in extreme heat *ahem* Oklahoma summer *ahem*. But when I saw it again later I decided that my attraction to this plant was too great, and that I was going to take it home anyway.  I planned to put it in a pot so that during these cooler sunny spring days it can sun itself on the patio, and in the hot-as-hell late July days I can move it to a cooler spot in the garden, or even into the house if it needs a reprieve from the heat.


Several days later it looked like this.


The multiple buds give me hope. But I have a funny feeling that it was a good thing that I took so many pictures of the darned ethereal thing, because they will probably last longer.

So, I guess this is just another lesson in the perils of impulsive passion based decision making.  But I enjoyed the journey and am slightly wiser today than I was a week ago, so I am still counting this as a garden success.

Wednesday, April 18, 2012

Garden Adventure: The Episode in Which We Find a Creepy Bug

It is not uncommon for me to find strange bugs in my garden or in my life, and I do what I usually do when I find something I don’t know, I google image search for it based on descriptions that usually go something like “creepy alien jumping shrimp bug” (aka: camel cricket) until I find a picture that sort of matches whatever I encountered. 

So on Garden Project Weekend 2012, when I came across this super creepy foreign entity and made my cowboy come look at it and eventually pitch it over the fence, I made a mental note to find out what it was.  Yes, I need a man to get rid of gross bugs for me, but he needs me to order the beer, so it evens out.
But later when I was going through pictures and I came across the one we took of Mystery Creepy Bug, I began my image search and discovered that it was the pupa form of a Five Spotted Hawk Moth.   The caterpillar of such is known as the Tomato Horn Worm, so pitching him over the fence was probably a good idea.  The article to which I was able to successfully identify my mystery bug was actually a very interesting introspect into life, relationships, and tomato gardening.  I really enjoyed it and wanted to share, "Hope and Tomato Season: Five Spotted Hawk Moth". 
Additionally, I found it fascinating that this moth spends 270 days in this pupa form in the ground. That is the same gestation period as a human baby. Now I kinda feel bad for pitching it over the fence. Except that its offspring would have feasted on my tomato patch, so actually, no I don’t feel that bad. Sorry Hawk Moth. This isn't personal. It's just that we want to eat the same thing. If only you were an earthworm, or even a butterfly, then we could be friends.
So tell me, how do you find out what something is when you don't know what it is called?  And what did we do before the interwebs? You can't exactly look up "creepy 3 inch pupa" in the index of an encyclopedia, can you?

Sunday, April 15, 2012

The Tower of Tomatoes

For months I had been looking forward to this day. I passed many cold January and February hours reading books and blogs for inspiration and solutions, sprouting seeds, and working my compost pile while dreaming about picking fresh produce from my backyard garden. After many wintry days spent thinking about my garden and what will go in it and how I can make it produce more, I had quite a few ideas to implement this spring. 

The most important ( but let's be honest, not quite the most exciting) endeavor was prepping the soil. This process actually started about 7 months ago, with a trip to the ranch and a truckload of horse poop.  My Sweet Cowboy helped me shovel, transport, and till it into the fall garden beds last October (that’s how I knew he was the one for me!).  When I started digging into the soil this spring I found earthworm metropolis, and thus, I am taking it the horse manure was a hit.  
I have never seen so many earthworms in my garden as I have this year.  Big ones, small ones, it's like a fishing bait shop exploded in my garden. I am pumped!

Yet, consider the manure of last fall as merely poop: round one.  And now for the double deuce. I got a pretty great deal on some "llama doo" at my favorite tomato farm, The Tomato Man's Daughter and so each new planting this year got a whopping scoop of fresh manure goodness.  Oh yea, if I ever needed any confirmation that My Sweet (borderline OCD clean-freak) Cowboy is head-over-boots in love with me, it is that he let me put 20 lbs. of llama doo into the back of his car. That's true love, baby!

The most significant soil project this year has less to do with putting nutrients in the soil, as it does with controlling the nutrient thieving of greedy weeds. *fist shaking!* After years of “whatever grows is cool” attitude and lazy weed control efforts, I am fighting back. I have been reading some good things about lasagna mulching, and trying my hand at a version of it.  I put down a layer of paper grocery bags that have been multiplying in my pantry, by opening the bottoms, and flatting them out and laying them like tile across my garden bed.  On top of this I placed a thick layer of grass and leaf clippings several inches deep.  I actually planted my vegetables directly into this, by cutting a whole into the bag, dropping in my llama doo, planting the plant and then pushing the mulch up around the base of the plant.   For extra measure, I spread a very light layer of wood mulch over the top.  I paid extra attention to the edge of my garden where grass loves to shoot up under the edging and attempt to convert my garden into a mini Tall Grass Prairie.  I am hoping that this multiple step approach will help stop weeds before they have taken over my garden.
You can see the grocery bags lined up with leaf and grass clippings piled on top and ready for plants.

However, the biggest under taking of the day was constructing two six foot trellises that will give tomatoes, squash, cucumbers, and maybe peas or green beans (if I get them planted soon), a lovely space for sun seeking.  I am thinking of adding some nasturtiums too for some pretty, but also edible, floral action.  The idea came from my desire to grow more of my own food with the space and resources available to me. Vertical Gardening by Derek Fell inspired the trellis construction. The book really has empowered me to just think more creatively about using vertical space instead of horizontal space. I decided that I wanted to try a Skyscraper Garden trellis and see if it really would increase my harvest.  If nothing else the vision of towering tomatoes just looks so cool in my mind that it is worth a shot.

The Cowboy very sweetly assisted in the design and provided the majority of the manpower necessary to complete this project.  Only two Band-Aid- required-accidents and no fights- in-the-middle-of-two-trips-to-Lowes later, we had two six foot trellises.  
I am not sure if there is much more attractive than a man working with his hands to make something for you

Oreo supervises trellis construction

The completed trellis frame, ready to go into the garden

We had to improvise on a few of our materials, and the Cowboy only had to walk away from the scene to regain his cool once after the second trellis fell apart during installation. I didn’t mind one bit, I was just impressed that something I had thought up in my head was becoming a reality. The Cowboy called the project “pre-marital counseling”.  I think I would take building things with my man any day of the week over talking about budgets or chore charts.
You see 2x4's and chicken wire, I see pico de gallo.  And Oreo sees a stick pile feast (gotta get some cayenne pepper sprinkled on that soon!)

At the end of the day we had built our two trellises out of 2x4x8s and chicken wire and a few stakes and dug two foot holes to secure the structures in the ground. We were well under budget for what we could have bought similar structures for at the hardware store and we got to bond over manual labor.  WIN.  We celebrated with an awesome celebration meal and then fell asleep on the couch.
Whole wheat pasta with grilled chicken and asparagus with lemon herb goat cheese sauce.

The night we finished building the trellis a huge line of tornadoes and thunderstorms swept through Oklahoma.   So while I should have been worrying about my own safety, I was mostly stressed over whether or not the trellises would hold up to some feisty Oklahoma spring weather. And they did! Hooray! 
This German Johnson tomato plant is ready to climb this trellis, I like to grow these tomatoes in honor of my Grandma Johnson whose started this garden. This heirloom tomato was also parent of the "Radiator Charlie's Mortgage Lifter" tomato and my Grandpa was called Charlie, so this is one way that I honor them.

So, what new projects do you have schemed up for your garden this year?  I'd love to hear what you are doing, and maybe borrow some ideas for my own little urban prairie homestead.

Friday, April 6, 2012

All You Can Compost: An adventure in integrating composting into daily life


Ok, I’ll be upfront with you, composting still sort of intimidates me.  Like, all the ratios of different types of material you should add to it, how hot or wet it should be for ideal composting, what type of container to use, when to turn it?  I want to know more, I want to become epic at composting (yes, I really do), but currently, I am the lazy composter.  So, if you are looking for the perfect recipe for composting or a review of the best strategy, you should keep Googling.  There are so many resources available.  Maybe a few years from now I will be one of them.
However, if you think you might want to compost, but you aren’t sure where to start, and you just need a little encouragement, this post is for you. Here is my biggest secret for success:
Compost something today.
I got into composting the same why I got into gardening, by accident.  I inherited a garden space with a compost pile made of wooden posts and chicken wire that had seen too many years as it is. For a long time, the compost pile was just where grass and leaf clippings went and magically they eventually disappeared, which made continuing to put more grass and leaf clippings into it pretty convenient.
The key here is that nature does all the work; you just give her the raw materials.  See, I was composting in my garden before I was even trying to compost.  That is how easy it is.  That is my most compelling argument about why, if you are even toying with the idea of composting, you should do it. Because it doesn’t have to be intimidating or a chore. 
I compost more intentionally these days.  One of the most encouraging things I’ve read recently that made me want to take more steps towards great amounts of composting is this list of 80 Items You Can Compost.
Things I Never Thought About Composting Before this list:
Dryer Lint
Stale Halloween candy
Q-tips (not plastic ones)
Used Kleenex
Booze (mostly because I don’t throw booze away!)
Cotton clothes, cut into strips
Toenail clippings
Cereal boxes (shred first)
Matches
I love this list because it goes beyond the obvious vegetable scraps and reminds me that if I start looking around me there is so much that I throw away that could be put to another use.  Did you read the 80+ Item list and get excited and inspired and then immediately overwhelmed by it? 
Me too.  My response was immediately “COMPOST ALL THE THINGS”, followed the next day by throwing away at least five of these items before I had even gone to work.  (Seriously, I threw away Kleenex, a q-tip, finger nail clippings, coffee grounds, and 2 avocado pits)
I am pretty initially ambitious by nature, but then struggle in the follow through, so I have learned that if I want to make any significant changes in my lifestyle that I have to pick an easy accessible option to adopt slowly and then build upon it.  When I first started composting on purpose I started by haphazardly  taking a plastic salad bin and putting fruit and veggie scraps, egg shells, and coffee grounds in it during the summer and taking it out to the compost pile every few days and digging a little hole and burying the organic matter inside. I learned that if you are going to be a lazy composter like me, it is important to grind up any seeds first if you put them in, or you will have stowaways in your compost ship who will grow up to be tomato plants you didn’t mean to plant there.  I embraced it as a testament that life is tenacious, a even maybe a sign that I will “reap what I did not sow” J
One of these tomatoes is not like the others, one of these tomatoes I grew on accident out of my compost pile :)


Next I learned that you could compost non-glossy paper, like junk mail, and I went to town shredding all sorts of things.  However, I never did get it into the pile, so, I guess I didn’t make that step easy enough.
Instead of looking at this list as my ultimate “I am going to compost everything on here” check list, which I am extremely tempted to do, I have decided that I will choose 5 categories to compost and work towards being more consistent at those items.
All plant based food scraps, tea bags, and egg shells
Strategy: keeping a bowl in the fridge to collect scraps
Let my apartment bound friends add their scraps to my pile
Junk mail (I want to try to be better at this one)
Strategy: sorting it at the mail box so that the pieces I will keep to compost go directing to the shred bin.
Q-tips, Kleenex, paper towels
Setting a bag in the garage to collect
Coffee grounds
Putting the grounds and filter directly into the food scraps bowl.
As I use up all my regular filters start buying non-bleached filters and organic coffee
Dust Bunnies/dog hair
When cleaning, instead of putting in trash throw it in the compost
The biggest obstacle to composting for me: The distance between my kitchen and the compost pile. Seriously, this is so lame, but really the biggest deterrent as at night when the scrap pile was full and I didn’t want to walk outside in the dark to the compost pile.  Hopefully, by admitting this out loud I can be held accountable to not be so lazy.
Parting thoughts on composting: Compost something today. Compost a strawberry top instead of throwing it away.  If you don’t have a garden or you can’t have a compost pile, make friends with someone who does.  It is only weird to give your friends your food scraps if you let it be weird.  The point is you don’t have to transform yourself into Captain Planet or Garden Star over night; take a step every day towards who you want to be, and embrace the journey.

Sunday, April 1, 2012

Seed Starting Greenhouse from Recycled Materials


I have many garden lusts on Pinterest.  (So many projects, so much easier to just drool over them on the internet.)  However, I try to be intentional about turning my Pinterest inspirations into reality, be it attempting DIY crafts, incredible looking recipes, or great recycling projects like this one, a mini greenhouse for starting seeds made from empty toilet paper rolls and plastic containers.  
 I loved this project because it was free to make, it used items I actually have in my house (toilet paper rolls, and plastic salad bins), and it accomplished a project I had intended to do anyway, start some tomato seedlings.
Depending on your household and how many seeds you want to start you might have all the supplies on hand immediately to start this project, or you might need a few days (or weeks – those who do not use much toilet paper) to save them up.
What you need:  you can visit the link for a complete tutorial.
1.       Empty toilet paper rolls, for each of my salad bin I needed 6 rolls, cut in half (the toilet paper rolls decompose in your garden so bonus!)
2.       Plastic bin like those from organic salad and spinach. I also made one from a rotisserie chicken and one from a cinnamon roll container. (So don't think you have to be all super organic or healthy to do this project.)
3.       Potting soil: I just bought some organic potting soil
4.       Seeds: Your choice
5.       Scooping utensil for transferring dirt and water

I ended up planting four containers.  Two full containers I planted with some heirloom tomato seeds I saved from last summer. I planted a total of 24 starter pots full of tomatoes.  Most of these sprouted so I will definitely have plants to share with friends in a few weeks (bonus!).  In the other two containers I planted 6 pots each of chili de agua, zucchini, oka, and tomatillo.  The chili pepper seeds I had saved from last year’s the garden and the zucchini, okra, and tomatillo seeds I had bought last year but didn’t plant.  So, in this entire project the only thing I actually bought was the organic potting soil, which was on sale, and for me, a worthwhile investment in my gardening adventures this year. 
For me, the direct costs for this project were less than $7. If I had bought each of my 52 plants for around $2.50 each I would have spent $130 (not including tax).  If I had bought a similar seed starting greenhouse kit like this one at Burpee.
I would have bought the 72 cell planter for the cost savings and spent $14. So, even looking at it from this angle, I still saved 50% of my costs by recycling products I would have otherwise thrown away.  Recycling options in my city are not very convenient and they only accept a pretty limited amount of items, so if not for this project I would have tossed the four bins and 26 cardboard toilet paper rolls. And isn’t that the heart of recycling, creatively accomplishing what we want to do with the resources we already have?

Garden Goal: Save More Seeds


My whole initial gardening desire was born out of a heart connection to my grandmother. As long as I knew my grandma she had a garden, and it was not uncommon to find seeds from all kinds of fruits and vegetables wrapped in paper towels or towed in jars all over.  In fact it was one of the little comical quirks she had that made her so lovely.  She passed away in the spring of 2007 and as a way to honor her I wanted to cultivate her garden.  In a way, her garden itself is a family heirloom.
But, I will just be really honest with you, I am a bad gardener.  Really bad.  Like I am only successful if I grow plants that flourish when neglected kind of bad.  When anything I plant grows at all I am pretty ecstatic and don’t get too upset when things don’t work out because I, say, forgot to water them for three weeks during 115 degree summer.  I really love the idea of gardening, but the actual work of weeding and remembering to water and all of that cultivation stuff is hard for me.  But for a wide and ever evolving set of reasons, I continue to go at it. I have had a lot of failures, and it is a blessing that in spite of whatever hopes I have to one day be able to grow all my own food, I have not had to rely on my own garden to sustain me.  My grandmother’s generation pioneered the victory garden, and I have pioneered the failure garden.
I first really became interested in heirloom plants after that first gardening year without my grandmother when I planted and fell in love with a pepper and a tomato.  Love at first bite. The pepper, chili de agua, had an intensity somewhere between a poblano and a jalepeno, and the black cherry tomato, a sweet, dark, mellow fruit that I searched for at farmer’s market stands for years after.  Maybe it was the fact that this chili was absolutely perfect filleted on a summer burger, or that this tomato was different than the standard red cherry tomato you can buy in the store that caused me to want to seek out these particular varieties.  After a couple years of searching, I finally discovered the heirloom tomato farm from which I had originally encountered these plants at a garden fair and planted almost my entire garden full of tomatoes, peppers, and some herbs.  I would have been swimming in salsa if it had not been the hottest driest summer in Oklahoma in decades.
This year I really wanted to save seeds and ensure I never was without my beloved chili pepper and tomato plants so I began to research heirlooms.  The more I learned, the more I felt like it was something I wanted to support beyond just my tomato obsession. It is true; you can’t walk into a grocery store and find these particular varieties of vegetable and fruit.  In fact, where I live, the selection of produce is so ordinary that trying to eat healthy can get really boring.  There is something in my spirit that says, it is good to grow these plants because they are different.  It is important to grow these plants because that means that they will continue to be enjoyed. And so, soap boxes about our nation’s food systems aside, I just want to continue to enjoy these plants, and that has led me to where I am today, learning about heirloom seed saving.
According to seedsave.org, vegetables that produce seed the same season as planted and are mostly self-pollinating are the ideal varieties for beginner seed saving gardeners to try.  Beans, lettuce, peas, peppers, and tomatoes are all excellent types to try if you are just starting out.  I actually happen to be trying to grow all of these veggies this year. YAY!
I took my Cowboy and we went to the store looking for heirloom seeds and much to my dismay no packages said “we are heirlooms”.  My sweet supportive Cowboy helped me pour over seed racks in a variety of stores checking the backs of packages and trying to figure out which of these seeds would satisfy me. Talk about an obstacle, all I wanted to do was grow some heirlooms and I couldn’t even find the dang seeds. After driving all over town, and feeling quite discouraged, I consulted the internet for some knowledge (which if I had done in the first place would have saved me a lot of trouble, I know, but that is not how impulsive go-getters do their gettin’).
I discovered several key facts:
  • If it does not say “FI Hybrid” it’s open pollinated.
  • ALL Heirlooms are open pollinated. Not all open pollinated seeds are Heirlooms.
Ok, that cleared up a LOT of questions in my mind when I was standing in the seed aisle of Home Depot, but regardless of the Hybrid versus Open Pollinated seeds; I still had a big question of how to acquire open pollinated heirloom seeds.  Oh thank Internet for being oh-so-made for these types of dilemmas.
And very importantly, I also confirmed that the seeds that I thought were heirlooms that I got from Seed Savers Exchange at Whole Foods ARE heirlooms! seedsavers.org This was the best news of all, since I already had some of these seeds, and I could easily get more.
In this process I also learned that for my small backyard garden, heirloom tomato seed saving might not be practical since I intend to plant several varieties of plants in a small space.  The seeds I “save” and am growing this year I actually saved from some tomatoes I bought at Whole Foods on sale to eat because the drought last summer was so rough on my tomato crop that I barely got any fruit.  However, I did come across a great resource, seedsave.org  which had a ton of practical and well organized information and instructions for saving the seeds of different types of vegetables. Book marked!  A book that I came across during my research called Seed to Seed by Suzanne Ashworth is going to go on my wish list so that I can really educate myself on this stuff.  Seed saving has been like most things in my life where I just follow my gut first and then learn for to actually do it later.
After all this internet reading, my conclusion is that if I want to do this, I need to focus on choosing heirloom seeds to grow, collecting heirloom seeds for the future from reputable sources, and when I am only growing one variety of a plant that won’t cross pollinate, then saving the seeds.  So this unfortunately rules out saving my tomato seeds (and tomatillos because they are similar to tomatoes), because I intend to grow several varieties.  However, I am planning on a couple of other plants for which I will only plant one type and for those I can save the seeds. 
Plants with seeds I want to save:
  • Pepper, chili de agua
  • Pepper, green bell (I am growing this on the other side of the yard, so I think it will be ok)
  • Peas
  • Beans (apparently beans are super difficult to cross pollinate because of the way the flower is formed, I did not know!)
  • Squash
  • Okra
  • Nasturtium
  • Marigold
  • Garlic (garlic grows basically wild in my garden, thanks to my awesome grandmother, so I put it on this list but it does not require much work from me)
My bench mark for success in this goal will be met if I save even just a handful more seeds this year, plant them next spring, and I start to educate myself about the science of seed saving and cultivation of heirloom plants.  Seriously, success will taste like putting that first chili pepper on my burger this summer and thinking about how it came from a seed from a pepper I grew last year. I might even do the awesome dance.