Tuesday, April 24, 2012

Dog Vs Garden: Meet the Fence

Never underestimate someone just because they have cute ears or flatter you with kisses

The biggest threats to our gardening efforts do not come from pests, but from those that snuggle up against my legs and keep me warm all winter long.  Yes, my pups may be my best friends, but they are not my garden’s best friends.

Over the last two years I have tried a variety of things to ward them off, with mediocre but up-till-now acceptable success.  I have mostly tried strategies that were low cost and low effort.  Someone suggested I try cayenne pepper sprinkled over the garden as a deterrent.  This might have worked out well, except that some accidentally got into my pup’s eye and it swelled shut for a day or so and I felt like the worst parent ever in the world. It was particularly depressing because it still didn’t keep him out of the garden.

When this failed, I finally decided to lay out a bit of cash and bought what we affectionately refer to as “the rock monster”, which is basically a battery operated invisible fence that keeps dogs away from its ten foot radius.  This worked well until the batteries died, but trained the dog to stay out of the garden until summer drought killed most things and a mini tall grass prairie sprung up and I didn’t care anymore if the dog ruined things or not.

Another idea I tried was my own special version “companion planting”.  I planted all my hot chili de aqua peppers around the outer edge of my garden in hopes that if my dog ventured in for a snack that he would have an unpleasant experience and never do it again.  This didn’t really have an effect.  My best plan was to plant multiples of everything as an insurance against canine catastrophe and hoped for the best. Yea, it wasn’t a great plan, but it was also pre-Cowboy involvement, and he has a way of improving my plans in ways I couldn’t previously imagine.

But this year there are now two dogs, which means like three times the destruction.  After all the effort to build trellises and defeat the weeds and our desire grow so many more items, we needed a better plan.  At first, I tried a liberal layer of cayenne pepper (with no puppy eyes harmed) but it didn’t stop either of them.  And we tried the rock monster, but only one could wear it at a time and it didn’t cover the whole garden.  So, after we lost a pepper and an eggplant to veggie loving pups within a few hours of planting, we decided we needed to break down and build a fence.  Not a pretty one, just an effective one, and as soon as possible.
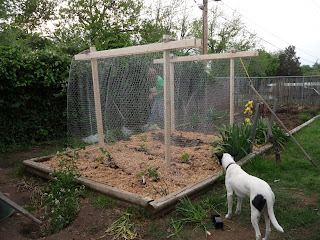
Harley sits safely on the other side of the new garden fence from this beautiful marguerite daisy plant The Cowboy picked out that will hopefully attract more butterflies and fewer puppy dogs.


The Cowboy came by on his day off and built it with his bare hands with the help of his roommate. I think a t-post driver was also involved, but I am still pretty sure his hands were bare. He said that the project went much faster than anticipated and texted pictures that looked great. And it was only a one band aid necessary project (trellis building was a two band aid day).  I came home from work that night eager to see his handiwork, but was greeted by only one puppy face at the gate!! Someone was missing.  That someone was behind the garden fence sitting with the marigolds he had ripped off their stems.  Scandalous!
The Marigold Murderer investigating checking out his handiwork


So, the next day was fence building day part two, which has so far proved quite effective.  The Cowboy re-enforced the breached defenses, constructed a gate, and I happily planted some additional plant selections. 


So far we have had no more blue heeler break-ins, so we hope our harvest losses have been minimized. Hopefully we have outsmarted them.  Although, you never want to underestimate a blue heeler, not even the tiny adorable cuddly ones. 


What strategies have you used to keeping your homestead harmoniously co-existing?  Do you have any hilarious failures or wild success tips for keeping canines out of the compost?  I am all ears.
Puppy Mug Shot

Monday, April 23, 2012

Whole Wheat Pasta with Goat Cheese and Grilled chicken and veggies


This dish is summer food.  It serves well hot or cold and can be made with for one or for a crowd, making it a great potluck or picnic dish.  It is also perfect for sitting on the patio kicking back with a beverage of your choice. This one is going to become a staple at our house this summer.  I am not including an ingredients list because I think that the exact selection of ingredients and amounts can vary to your choice, access, and based on what purpose this dish will serve. I have made a version of this for just me and The Cowboy and I made the dish described here now for a house church gathering with 15 to 20 lovely people.  It is really versatile and easy and full of delicious things.  Be free to enjoy it whichever way fits your life best.

First marinate your chicken in dry spice rub and a splash of balsamic vinegar. Once you get them nice and rubbed up, set them in the fridge while you prep everything else. This step can be done at least 20 minutes ahead, but could be done several hours ahead for maximum marinating goodness.

Use vegetables of your choice. We used asparagus, red pepper, mushrooms and onion. Wash and cut veggies, keeping as whole as possible for grilling.  Example, I cut the peppers in half and left the mushrooms and asparagus whole.  I used the last third of an onion I had in the fridge and just grilled the whole thing intact. Keeping them whole makes it easier to grill.  Marinate in spices, a touch of olive oil, a generous splash of balsamic vinegar, and a tiny splash of Worcestershire sauce.  I don’t think it matters as much what kind of spice you use, so much as that you use something you like and let the veggies marinate in them a bit.  Additionally, customize your veggies to your own taste and what is available and affordable.  The grocery store had really cheap red pepper, so I included them when originally I hadn’t planned them in this dish.  They were such a good addition, but next time, if they weren’t available, I’d use something different, squash or eggplant or maybe even okra. This summer as I start gathering a harvest from my garden we will use whatever we picked that day. I am pretty pumped about that.

The next step is to peel a whole head of garlic. Yes. Trust me on this.  Make a little aluminum foil boat and put your garlic in there with olive oil, salt, and pepper, a touch of truffle oil and rosemary leaves.  You are going to roast this garlic on the grill while the chicken and veggies cook. With the other mushrooms in this dish, the truffle oil makes a nice accent, but is very optional.  If you have some available, I suggest trying it, if not, I would omit.


Heat up grill to medium high.

Boil salted water for pasta.

Put garlic boat on second shelf and grill chicken on medium-high until fully cooked. That means an internal temperature of 165 degrees food safety lovers.  You are going to leave the garlic on the cooler shelf of the grill during the duration of cooking the chicken and veggies.
Set your garlic boat on the ledge of your grill, or in a cooler spot so that it can slowly roast and not burn.

Grilled marinated mushrooms, I am salivating right now.

Your vegetables really do not require cooking, so what you are looking for is just a little charing while still being quite firm.  I found in this recipe that my asparagus was finished first, then the mushrooms, and finally the red pepper (for which I prefer a little more charring).  I like my veggies to still be pretty crisp but enjoy the smokey grilled flavor.
When you water is boiling add your whole wheat pasta and cook to al dente.  Drain out the cooking water, saving one cup to make sauce. Put the pasta into a large bowl.   Incorporate the soft goat cheese and the pasta water back into the pasta.  It will melt into a creamy light sauce.  Add the zest of a lemon and about half of the juice from that lemon. Add fresh tarragon and bit of ground pepper.


Chop your chicken, veggies, and garlic and add them to the pasta, as well as several generous handfuls of baby arugula.

Serve immediately, or take with you to house church to share with your family on a Friday night :) Whatever you do, enjoy a lovely meal.

Sunday, April 22, 2012

Garden Spotlight: Icelandic Poppy

You know that feeling you get when you see someone and you are simultaneously aware of how ridiculously attracted you are to them and how much trouble they will bring into your life.

I recently had an encounter like this last week at the garden store.  Not with a person, but with a plant. I fell in love at first sight with a poppy.  An Icelandic Poppy. I saw it and the way the six o'clock light filtered through it's almost glowing pink papery petals took my breath away. At first standing there in the store googling it from my phone, I decided it was a bad idea since experts advised that it did not do well in extreme heat *ahem* Oklahoma summer *ahem*. But when I saw it again later I decided that my attraction to this plant was too great, and that I was going to take it home anyway.  I planned to put it in a pot so that during these cooler sunny spring days it can sun itself on the patio, and in the hot-as-hell late July days I can move it to a cooler spot in the garden, or even into the house if it needs a reprieve from the heat.


Several days later it looked like this.


The multiple buds give me hope. But I have a funny feeling that it was a good thing that I took so many pictures of the darned ethereal thing, because they will probably last longer.

So, I guess this is just another lesson in the perils of impulsive passion based decision making.  But I enjoyed the journey and am slightly wiser today than I was a week ago, so I am still counting this as a garden success.

Thursday, April 19, 2012

Spray Painting the Town: Upcycled Patio Planters


Spray paint might be one of my favorite tools for affordably breathing new life into old furniture and household items.  I have used it to restyle many a basket, wreath, vase, and dresser or end table into something new and fabulous.  It's easy to use and cheap, it looks great on so many surfaces, and you can do so much with it.  Infact, just this week, I watched my neighbor spray painting the white metal awnings of his all-white house to a deep green.  It instantly added so much charm.  I probably won't be painting my awnings any time soon, but I do appreciate his creativity.
These two plastic planters that held large store bought mums last fall recently received a makeover to turn them into cheerful spring planters for my patio.  With some left over paint from a previous project and a few minutes I took these pots from trash pile to re-styled.
These plastic pots have been washed and are drying in the afternoon sun awaiting their makeover

First wash out your pot, making sure to get any dirt or stickers may have been attached. Some people suggest washing pots that previously held plants with bleach so that you start with a sterile surface when planting new needs or plants.  I washed these pots and placed them on the patio in the afternoon sun to dry.

When your clean pots are dry set them on a level surface away from anything that could be damaged by paint.  I always try to do my spray painting projects outside.  There is the spot where they dogs have flattened the grass, so I don’t might if it gets a little paint on it.  You can also lay out a tarp or newspaper to protect the ground before you start painting. The best time to spray paint is when there is just a slight breeze.  If it is too windy, dust or leaves may blow on your wet paint, and you may lose a lot of your paint coming out of the can.  But a slight breeze can help ventilate the area.

I set my pots upside down and spray the outside first. Don’t spray the bottom, unless you are willing to wait a while to ensure it is dry before flipping the pot over.  Spray your pots with small even circular motions so being careful to not get to much paint on any one spot, or it will drip, and to ensure an even coat.  You may need to do two coats depending on your paint.  Once it looks even, let it dry.


Turn the pot over, and apply a coat of paint to the inside, focusing mostly on the top half of the pot. Remember, you are going to fill this with dirt, so you really don’t need to paint it all the way to the bottom, but you can if you want to.  I usually focus my paint on the areas that will be visible.
While one pot dries you and paint the other, and about the time you finish the second the first will be dry

Again, let the planters dry.  One of the nice things about spray paint is that it dries really fast, so this whole project including waiting for the pots to dry three times takes me less than an hour.

I usually let them fully air out for a few days before I plant anything in my pots. 
Can't wait to plant! These pots already brighten up my patio.

For this project I used Rust-Oleum Painter's Touch Ultra Cover spray paint in Brilliant Blue (Gloss finish) and Eden (Satin finish) I like it because it covers evenly in about one coat and with one can of paint I have been able to cover about three pots and one large wicker basket.  Because it sprays two coats at once, it works great for projects where you want solid color blocks.  For projects where you want to blend colors, I have had a lot of success with Krylon Indoor/Outdoor.
Are you excited and about to take a boring pot and make it awesome?!  I want to hear about it.
What items do you have in your house or garage that could be given a new life through a simple coat of paint?

Wednesday, April 18, 2012

Garden Adventure: The Episode in Which We Find a Creepy Bug

It is not uncommon for me to find strange bugs in my garden or in my life, and I do what I usually do when I find something I don’t know, I google image search for it based on descriptions that usually go something like “creepy alien jumping shrimp bug” (aka: camel cricket) until I find a picture that sort of matches whatever I encountered. 

So on Garden Project Weekend 2012, when I came across this super creepy foreign entity and made my cowboy come look at it and eventually pitch it over the fence, I made a mental note to find out what it was.  Yes, I need a man to get rid of gross bugs for me, but he needs me to order the beer, so it evens out.
But later when I was going through pictures and I came across the one we took of Mystery Creepy Bug, I began my image search and discovered that it was the pupa form of a Five Spotted Hawk Moth.   The caterpillar of such is known as the Tomato Horn Worm, so pitching him over the fence was probably a good idea.  The article to which I was able to successfully identify my mystery bug was actually a very interesting introspect into life, relationships, and tomato gardening.  I really enjoyed it and wanted to share, "Hope and Tomato Season: Five Spotted Hawk Moth". 
Additionally, I found it fascinating that this moth spends 270 days in this pupa form in the ground. That is the same gestation period as a human baby. Now I kinda feel bad for pitching it over the fence. Except that its offspring would have feasted on my tomato patch, so actually, no I don’t feel that bad. Sorry Hawk Moth. This isn't personal. It's just that we want to eat the same thing. If only you were an earthworm, or even a butterfly, then we could be friends.
So tell me, how do you find out what something is when you don't know what it is called?  And what did we do before the interwebs? You can't exactly look up "creepy 3 inch pupa" in the index of an encyclopedia, can you?

Sunday, April 15, 2012

The Tower of Tomatoes

For months I had been looking forward to this day. I passed many cold January and February hours reading books and blogs for inspiration and solutions, sprouting seeds, and working my compost pile while dreaming about picking fresh produce from my backyard garden. After many wintry days spent thinking about my garden and what will go in it and how I can make it produce more, I had quite a few ideas to implement this spring. 

The most important ( but let's be honest, not quite the most exciting) endeavor was prepping the soil. This process actually started about 7 months ago, with a trip to the ranch and a truckload of horse poop.  My Sweet Cowboy helped me shovel, transport, and till it into the fall garden beds last October (that’s how I knew he was the one for me!).  When I started digging into the soil this spring I found earthworm metropolis, and thus, I am taking it the horse manure was a hit.  
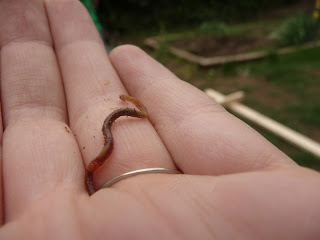
I have never seen so many earthworms in my garden as I have this year.  Big ones, small ones, it's like a fishing bait shop exploded in my garden. I am pumped!

Yet, consider the manure of last fall as merely poop: round one.  And now for the double deuce. I got a pretty great deal on some "llama doo" at my favorite tomato farm, The Tomato Man's Daughter and so each new planting this year got a whopping scoop of fresh manure goodness.  Oh yea, if I ever needed any confirmation that My Sweet (borderline OCD clean-freak) Cowboy is head-over-boots in love with me, it is that he let me put 20 lbs. of llama doo into the back of his car. That's true love, baby!

The most significant soil project this year has less to do with putting nutrients in the soil, as it does with controlling the nutrient thieving of greedy weeds. *fist shaking!* After years of “whatever grows is cool” attitude and lazy weed control efforts, I am fighting back. I have been reading some good things about lasagna mulching, and trying my hand at a version of it.  I put down a layer of paper grocery bags that have been multiplying in my pantry, by opening the bottoms, and flatting them out and laying them like tile across my garden bed.  On top of this I placed a thick layer of grass and leaf clippings several inches deep.  I actually planted my vegetables directly into this, by cutting a whole into the bag, dropping in my llama doo, planting the plant and then pushing the mulch up around the base of the plant.   For extra measure, I spread a very light layer of wood mulch over the top.  I paid extra attention to the edge of my garden where grass loves to shoot up under the edging and attempt to convert my garden into a mini Tall Grass Prairie.  I am hoping that this multiple step approach will help stop weeds before they have taken over my garden.
You can see the grocery bags lined up with leaf and grass clippings piled on top and ready for plants.

However, the biggest under taking of the day was constructing two six foot trellises that will give tomatoes, squash, cucumbers, and maybe peas or green beans (if I get them planted soon), a lovely space for sun seeking.  I am thinking of adding some nasturtiums too for some pretty, but also edible, floral action.  The idea came from my desire to grow more of my own food with the space and resources available to me. Vertical Gardening by Derek Fell inspired the trellis construction. The book really has empowered me to just think more creatively about using vertical space instead of horizontal space. I decided that I wanted to try a Skyscraper Garden trellis and see if it really would increase my harvest.  If nothing else the vision of towering tomatoes just looks so cool in my mind that it is worth a shot.

The Cowboy very sweetly assisted in the design and provided the majority of the manpower necessary to complete this project.  Only two Band-Aid- required-accidents and no fights- in-the-middle-of-two-trips-to-Lowes later, we had two six foot trellises.  
I am not sure if there is much more attractive than a man working with his hands to make something for you

Oreo supervises trellis construction

The completed trellis frame, ready to go into the garden

We had to improvise on a few of our materials, and the Cowboy only had to walk away from the scene to regain his cool once after the second trellis fell apart during installation. I didn’t mind one bit, I was just impressed that something I had thought up in my head was becoming a reality. The Cowboy called the project “pre-marital counseling”.  I think I would take building things with my man any day of the week over talking about budgets or chore charts.
You see 2x4's and chicken wire, I see pico de gallo.  And Oreo sees a stick pile feast (gotta get some cayenne pepper sprinkled on that soon!)

At the end of the day we had built our two trellises out of 2x4x8s and chicken wire and a few stakes and dug two foot holes to secure the structures in the ground. We were well under budget for what we could have bought similar structures for at the hardware store and we got to bond over manual labor.  WIN.  We celebrated with an awesome celebration meal and then fell asleep on the couch.
Whole wheat pasta with grilled chicken and asparagus with lemon herb goat cheese sauce.

The night we finished building the trellis a huge line of tornadoes and thunderstorms swept through Oklahoma.   So while I should have been worrying about my own safety, I was mostly stressed over whether or not the trellises would hold up to some feisty Oklahoma spring weather. And they did! Hooray! 
This German Johnson tomato plant is ready to climb this trellis, I like to grow these tomatoes in honor of my Grandma Johnson whose started this garden. This heirloom tomato was also parent of the "Radiator Charlie's Mortgage Lifter" tomato and my Grandpa was called Charlie, so this is one way that I honor them.

So, what new projects do you have schemed up for your garden this year?  I'd love to hear what you are doing, and maybe borrow some ideas for my own little urban prairie homestead.

Tuesday, April 10, 2012

Sweet Potato Chicken Nachos


Sweet Potato Chicken Nachos, with tons of crushed garlic adorning the top
This meal idea came to me on evening when I was looking for something that would be a good conduit for crushing raw garlic and getting some super charged vitamin nutrition. (Yes, it is really a blessing that my fiancé proposed to me before I adopted this particular health routine.)  At first I thought I had stumbled upon the next food holy grail, but after some internet research found that others had discovered it first. After I consoled my inner Christopher Columbus, I decided to just be thankful I had discovered such a delicious food at all and made myself another plate. This is definitely a recipe in progress, but it is still worth sharing.  It is easily expanded to feed more people.  I recently shared it with my house church family and it met rave reviews.  However, it is also a super easy and nutritious meal for one, you might want to cut the potato in half and save part, or make the whole dish and have tomorrows lunch already made.

Ingredients: (this recipe serves one very big hungry, or two 20-something ladies)

1 med. Sweet potato, washed
2 left over chicken thighs, or one 6-8oz chicken breast
1 tablespoon canned chipotle and adobo sauce
1 tablespoon olive oil
1 teaspoon chopped rosemary
1 teaspoon thyme
cheese of preference, cheddar or mozzarella work well
cilantro and chopped green onion to taste
crushed garlic to taste (optional, but delicious!)
salt and pepper
Method:
Pre-nacho making you will want to secure some chicken. Now I have used chicken that I had previously cooked in several instances, and when I made this for my house church I made shredded chicken in my crock pot by layering the chicken in some brisket rub and letting it simmer for 8 hours while I was at work. Rotisserie chicken from the store would also be really good and super easy in this recipe. Just use chicken you like and cut it up in strips or bite sized pieces, and make sure it is hot when you put it on the potatoes. Those are my only suggestions. You have full chicken liberties.

Start by baking or microwaving one sweet potato until it is almost done, but not mushy.  My microwave does that at about 75% of the time I’d use to fully cook a potato in the microwave.  You can also bake them.  I have done both. Baking tends to crisp up the skin, which can make it difficult to slice.  The sweet potato happy place is to cook the potato until it is cooked through but still firm. I find that depending on the size of the potato this may or may be too much for your personal appetite so adjust to what you have and will eat.  Nice part is that this meal reheats well.


While the potatoes are cooking take one chipotle and slice up at least half, but more if you want it spicier.  If you don’t like your food too spicy then just scoop out the adobo sauce. Mix this in a bowl with the olive oil and at least one clove of crushed garlic.  Add in the herbs and a pinch of salt and pepper.  It will be almost a paste.
My Sweet Cowboy preparing sweet potato nachos for house church

When the potato is almost done pre-cooking, carefully cut it into slices that are about a quarter inch thick. Use a technique similar to slicing tomatoes for burgers.  Vertically pierce the skin with the tip of your knife and then cut down horizontally to that you don’t smash the potato.  This technique took my fiancé a little bit of time to master, so don’t feel bad if your first round of nachos are more like potato smashes, they will still taste awesome.  Once you have the potatoes sliced, liberally coat both sides with the chipotle mixture, and heat up your sauté pan. I love these in a cast iron skillet.


 Get your cheese and your herbs ready.  You can do either slices or shredded, so pick your cheese preference and prepare.  For two people, I prefer a quarter cup of loosely chopped cilantro and green onion, but I am a big herb fan, so adjust to your own taste.
Sweet potato nacho slices sizzling away in chipotle garlic olive oil

Once your skillet is hot, add your potatoes. There should be enough oil on them that you do not need to add any to the pan.  You want the temperature to be high enough that they brown, but not high enough that the raw garlic burns.  Medium on a gas stove is good for me, but keep an eye on it. When the bottoms are brown and crispy, turn them over (if using sliced cheese, add now for optimum meltage, if using shredded, wait until they are done.)  When they are browned on the other side, arrange them on your plate, add cheese if you haven’t already. Top with your chicken before adding your cilantro and green onions.  Optionally, if you are trying to ward off a cold, or vampires, crush additional garlic over the top.  (The key really is to crush it, btw.)  I seriously recommend this with a side of black bean and mango salsa.

Saturday, April 7, 2012

Mango Flaxseed Bread

Hooray!! It is Mango Flaxseed Bread season!

I have always been a big fan of quick breads.  They are, as stated in the name, quicker than regular bread, and they taste like cake. WIN.  Mango flaxseed bread is a great summer alternative to your autumn pumpkin bread, or whenever you can get mangoes in season where you live.  And the flaxseeds help, at least in my mind, increase the nutritional content of what is essentially a dense cake perfect for breakfast, or afternoon snack.  It even holds its own as a post dinner dessert.

You want to start with three or four ripe mangoes.  Kind of like with bananas and avocados, you may have to buy them several days before you plan to use them so that they will be ripe, or, like me, you might consider adopting a rule that if there are ripe mangoes or avocados for sale at a great price that you adjust your menu and make guacamole, or in this case, mango flaxseed bread.

So, a quick word about flax seeds. I usually keep ground flaxseeds in my fridge so that they are conveniently available to throw into a variety of things, from breads to yogurt.  If you get them whole, make sure you grind them in a spice or coffee grinder before adding to the batter so that you get the full benefit of the omega 3 oils and fiber.

While you certainly can use whatever spices you have on hand, I think that the use of fresh ginger really makes this recipe pop.  I keep it in the freezer (since fresh ginger spoils quickly even in the fridge) so that I can add it in small quantities whenever I need it.  I use a microplane to finely grate the ginger and the nutmeg into the batter.

Ingredients:

2 cups all-purpose flour
2 teaspoons baking soda
1 teaspoon cloves
2 teaspoons fresh ginger
½ teaspoon fresh nutmeg
¼ teaspoon salt
1 ½ cups brown sugar
3 eggs
½ cup melted unsalted butter
1 teaspoon vanilla
3 or 4 mashed mangoes (about 2 cups, but if it is a little bit more if certainly won’t hurt it)
½ cup ground flax seeds

Preparation:

Start by preheating your oven to 350 degrees and setting out your eggs so that they have a chance to warm up to room temperature. Next wash your mangoes and peel the skin off with a paring knife.  Once the mangoes are peeled you can use the same knife to start removing the fruit from the pit.  Don’t worry about cutting perfect strips because once you get the fruit off the pit you are going to chop it finely to a chunky mashed texture.  When you get that finished set it aside in a bowl.

Combine all your dry ingredients, including the spices in a separate bowl.
 

Next melt your butter and add the butter and vanilla to your mangoes.  One by one add an egg and incorporate it to your fruit before adding the next.  When you have all your wet ingredients mixed in one bowl, and all the dry ingredients mixed in another, slowly add about a cup at a time of the dry ingredients to your wet ingredients.  Fully mix in each cup of dry ingredients before adding your next, until you have incorporated all ingredients. 

The batter will be very sticky and dense, almost dry, although depending on how juicey your mangoes are this could vary.

Lightly grease two bread loaf pans, and divide the batter between them using a spatula to push the batter into the corners of the pan.  Place the pans in the center of your oven and bake for about 45 to 55 minutes, or whenever you can put a knife in it and pull it out clean.  Pull the pans out and let them cool for about 10 minutes before inverting them on a plate to remove the pans and then let them cool completely, if you can stand it.  Or slice them up, spread just a touch of butter on them, and enjoy the hot mango goodness hot from the oven.
It is a good thing there are two loaves, because you may devor one hot from the oven before it even cools

Friday, April 6, 2012

All You Can Compost: An adventure in integrating composting into daily life


Ok, I’ll be upfront with you, composting still sort of intimidates me.  Like, all the ratios of different types of material you should add to it, how hot or wet it should be for ideal composting, what type of container to use, when to turn it?  I want to know more, I want to become epic at composting (yes, I really do), but currently, I am the lazy composter.  So, if you are looking for the perfect recipe for composting or a review of the best strategy, you should keep Googling.  There are so many resources available.  Maybe a few years from now I will be one of them.
However, if you think you might want to compost, but you aren’t sure where to start, and you just need a little encouragement, this post is for you. Here is my biggest secret for success:
Compost something today.
I got into composting the same why I got into gardening, by accident.  I inherited a garden space with a compost pile made of wooden posts and chicken wire that had seen too many years as it is. For a long time, the compost pile was just where grass and leaf clippings went and magically they eventually disappeared, which made continuing to put more grass and leaf clippings into it pretty convenient.
The key here is that nature does all the work; you just give her the raw materials.  See, I was composting in my garden before I was even trying to compost.  That is how easy it is.  That is my most compelling argument about why, if you are even toying with the idea of composting, you should do it. Because it doesn’t have to be intimidating or a chore. 
I compost more intentionally these days.  One of the most encouraging things I’ve read recently that made me want to take more steps towards great amounts of composting is this list of 80 Items You Can Compost.
Things I Never Thought About Composting Before this list:
Dryer Lint
Stale Halloween candy
Q-tips (not plastic ones)
Used Kleenex
Booze (mostly because I don’t throw booze away!)
Cotton clothes, cut into strips
Toenail clippings
Cereal boxes (shred first)
Matches
I love this list because it goes beyond the obvious vegetable scraps and reminds me that if I start looking around me there is so much that I throw away that could be put to another use.  Did you read the 80+ Item list and get excited and inspired and then immediately overwhelmed by it? 
Me too.  My response was immediately “COMPOST ALL THE THINGS”, followed the next day by throwing away at least five of these items before I had even gone to work.  (Seriously, I threw away Kleenex, a q-tip, finger nail clippings, coffee grounds, and 2 avocado pits)
I am pretty initially ambitious by nature, but then struggle in the follow through, so I have learned that if I want to make any significant changes in my lifestyle that I have to pick an easy accessible option to adopt slowly and then build upon it.  When I first started composting on purpose I started by haphazardly  taking a plastic salad bin and putting fruit and veggie scraps, egg shells, and coffee grounds in it during the summer and taking it out to the compost pile every few days and digging a little hole and burying the organic matter inside. I learned that if you are going to be a lazy composter like me, it is important to grind up any seeds first if you put them in, or you will have stowaways in your compost ship who will grow up to be tomato plants you didn’t mean to plant there.  I embraced it as a testament that life is tenacious, a even maybe a sign that I will “reap what I did not sow” J
One of these tomatoes is not like the others, one of these tomatoes I grew on accident out of my compost pile :)


Next I learned that you could compost non-glossy paper, like junk mail, and I went to town shredding all sorts of things.  However, I never did get it into the pile, so, I guess I didn’t make that step easy enough.
Instead of looking at this list as my ultimate “I am going to compost everything on here” check list, which I am extremely tempted to do, I have decided that I will choose 5 categories to compost and work towards being more consistent at those items.
All plant based food scraps, tea bags, and egg shells
Strategy: keeping a bowl in the fridge to collect scraps
Let my apartment bound friends add their scraps to my pile
Junk mail (I want to try to be better at this one)
Strategy: sorting it at the mail box so that the pieces I will keep to compost go directing to the shred bin.
Q-tips, Kleenex, paper towels
Setting a bag in the garage to collect
Coffee grounds
Putting the grounds and filter directly into the food scraps bowl.
As I use up all my regular filters start buying non-bleached filters and organic coffee
Dust Bunnies/dog hair
When cleaning, instead of putting in trash throw it in the compost
The biggest obstacle to composting for me: The distance between my kitchen and the compost pile. Seriously, this is so lame, but really the biggest deterrent as at night when the scrap pile was full and I didn’t want to walk outside in the dark to the compost pile.  Hopefully, by admitting this out loud I can be held accountable to not be so lazy.
Parting thoughts on composting: Compost something today. Compost a strawberry top instead of throwing it away.  If you don’t have a garden or you can’t have a compost pile, make friends with someone who does.  It is only weird to give your friends your food scraps if you let it be weird.  The point is you don’t have to transform yourself into Captain Planet or Garden Star over night; take a step every day towards who you want to be, and embrace the journey.

Monday, April 2, 2012

Getting Back to Our Grassroots


You know sometimes you have to get out of your urban prairie with the salty smell of fast food frying at the Wendy’s one block down, and the sounds of motorcycles and lawn mowers growling all around you. You need to get yourself out into a place where the smell of spring grasses and the sounds of white tails darting through the trees and the wind blowing strong across the land start speaking life back into your soul.  After a long, busy winter battling sickness and spending too many long hours in the office, my soul had been craving some prairie time and so we packed a picnic and the pups and we took off for the Tallgrass Prairie Preserve in Pawhuska, OK. 

The Tallgrass is a very special place to us because when we were first dating we went hiking there with just the Oreo dog, it is the place where Matt claims I first “grabbed his hand”. It is also the place where my wild dog managed to break the key to Matt’s car off in the trunk lock, so that we had to call someone to drive almost two hours into nowhere to bring us a spare.  I thought that if Matt still liked me in spite of my insane dog that he was worth keeping around.  Matt kept his composure, and I kept Matt, so I think it was a pretty successful trip.

Since adopting my second blue heeler mix, we have been itching to take both dogs to the Tallgrass and to get some quality hiking time in.  The weather and my immune system finally decided to cooperate, so this weekend we found ourselves on a much needed day trip. The Tallgrass is just far enough away that it makes me feel like I am getting out and away from my city life, but close enough that our only expense for this date is the cost of the gas to get there.  (with gas prices on the rise as we head into summer, we had added incentive to go now instead of later in the summer!)  That's right this beautiful place is free to enjoy, although they do accept donations.  And, I feel like I gotta give them a shout out for having clean and comfortable bathrooms.  I mean, I like getting out in nature and feeling the pioneer spirit soar within me, but when nature calls, I also really like modern toliets.

For this trip I experimented with two other Pinterest inspirations, mason jar salads and smoky sweet potato hummus.  I wanted healthy awesome hiking foods and I also wanted to see how well these foods would do as possible road trip foods for an upcoming cross country trip. The verdict: delicious and cost effective.
Oreo thinks this delicious spread is for him. Sorry buddy. 


Smokey Sweet Potato Hummus

I made several adjustments to recipe for the sweet potato hummus to suite my personal preferences, but overall, I gotta say that it was awesome and was excellent with our fresh cut veggies.  Will make again.
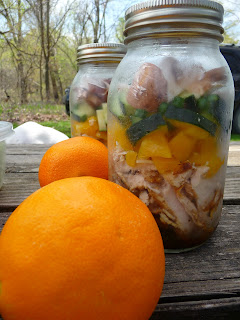
So the supposed trick with these salads in a jar is to layer the ingredients starting with the dressing and heavier items first and then working up to the lighter items that are prone to wilting.  I guess I just like my salad with too many goodies in it, but I ended up not being able to fit the lettuce into the jars at all and we brought another container of lettuce and then dumped the mason jar ingredients out on our lettuce when it was time to eat.  This isn’t really a problem to me, but the appeal of having your whole salad in the cute little mason jar was lost. Oh well, the food was delicious, satisfying, and just what we needed for hiking in the prairie.


Salad fixings (sans lettuce) in extra large jars

So, one of the reasons to go to the Tallgrass is definitely to see the buffalo. That’s right.  The Tallgrass Prairie Preserve is home to 2,500 American Bison that roam free on 23,000 of the Preserves 39,000 acres.  In previous Tallgrass trips I have not been very close to the buffalo.  While it is still pretty neat to see the herds way off on the prairie horizon, it is quite an experience to watch them grazing right alongside your car.  This was the first time where we really got to spend some time with these beautiful creatures, total highlight.
We saw this herd upclose during our hike


We saw several decent sized herds right along the road as we drove through the Preserve

While the drive through the free roaming bison acreage is quite breath-taking, my favorite part of the Tallgrass is the Prairie Earth Trail. This trail takes you through a very bio-diverse and extremely beautiful section of the preserve. It offers a lot of variety in terms of terrain and wildlife and is just about the right length for us.  Here are several of my favorite scenes from our time on the trail.


I can't decide what this is, but it was beautiful!


Spring Beauty, true to its name
Prairie Iris, and my favorite flower from this trip
Happiness is a cool mud pit on a hot spring day

Heelers <3 Prairies

We saw 7 or 8 white tailed deer in this wooded area and the pups tracked one of them up this trail for a while before getting distracted by squirrels
When we drove home that afternoon, exhausted and windlbown, our feet were a little more tired, but our souls felt a lot more peace.  It is amazing how this place has the power to just settle your soul.  Sometimes I go out here expecting for God to speak to me in the quiet of a wide open space, and while I don't always recieve the wisdom or direction I had come seeking, I always carry home a deep revelation of more joy. I can feel that same joy even now, sitting in my little homestead in this urban prairie.  And that is the true value to me of the Tallgrass Prairie Preserve.